Step 1: Configure Your Company Settings
Before creating shipments, configure your company details and company location. Your company location is used as the starting and ending point for shipment distance calculations throughout worxTMS.
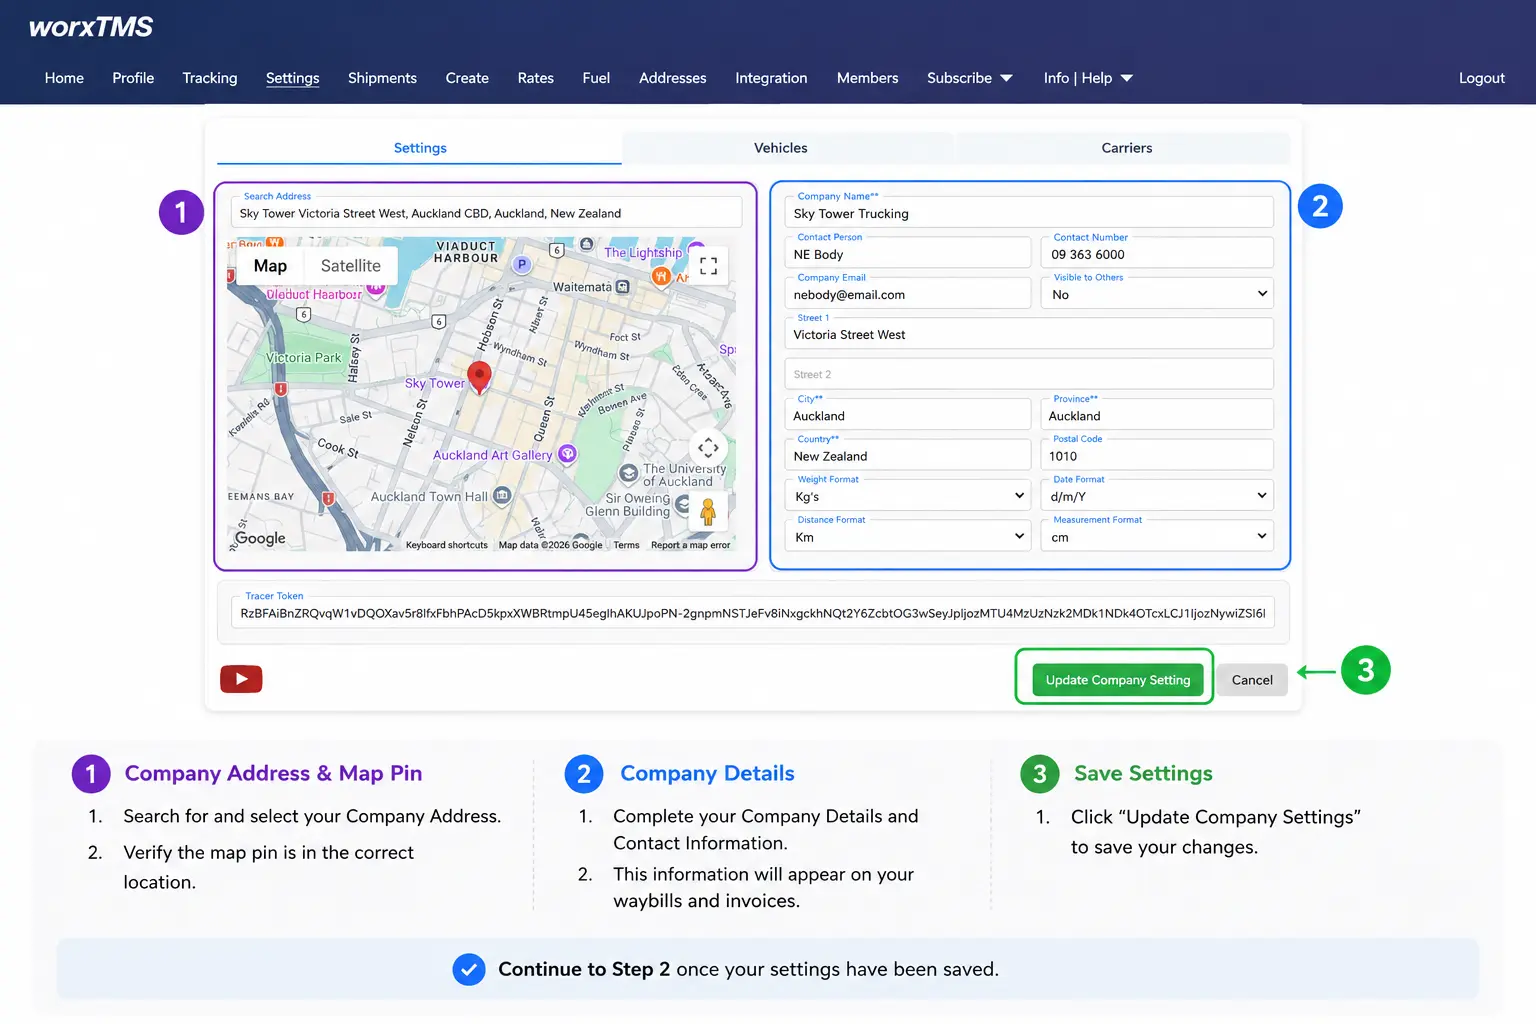
- Go to the Settings page.
- Search for and select your Company Address.
- Verify the Map Pin Location is correct.
- Complete your Company Details and Contact Information.
- Select your preferred Date, Distance, Weight, and Measurement formats.
- Click Update Company Settings.
⚠️ Important: Make sure your Company Address and Map Pin Location are correct. worxTMS uses this location when calculating shipment distances and operational reporting.
Step 2: Add Your First Driver
Create your first Driver account. Drivers use these login details to access the worxTMS Driver App and receive assigned shipments.
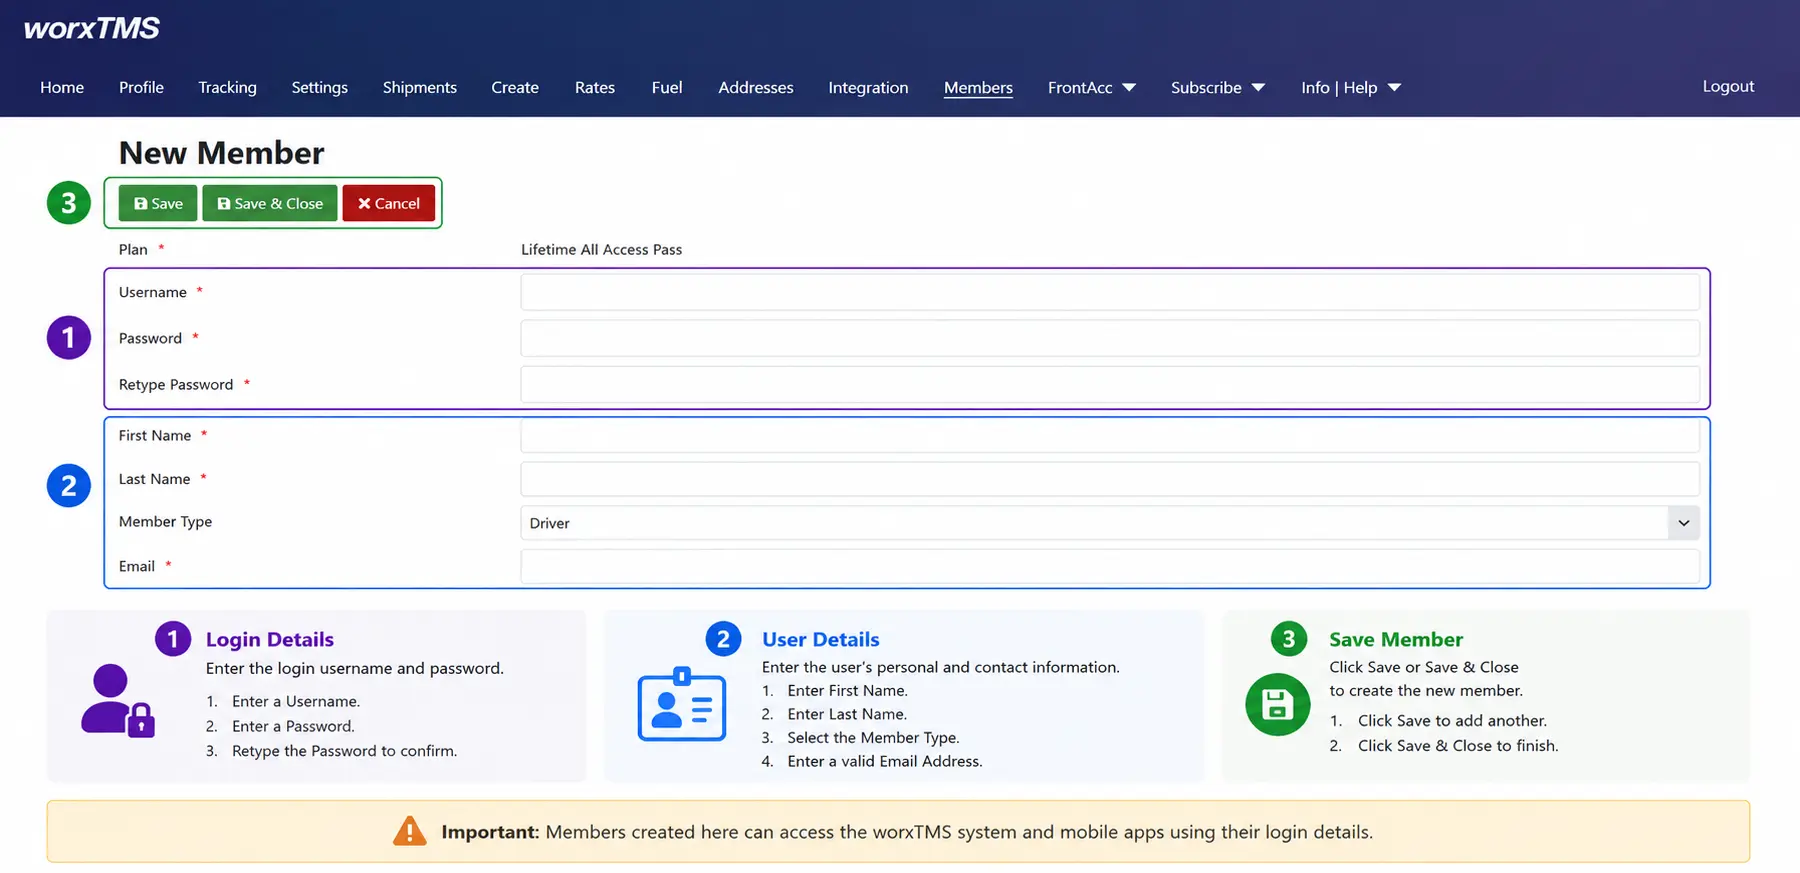
- Go to the Members page.
- Enter a Username and Password for the Driver.
- Enter the Driver's First Name, Last Name, and Email Address.
- Select Driver as the Member Type.
- Click Save or Save & Close.
Activate the Driver Account, Log In & Enable Tracking
- The Driver will receive an Account Activation Email.
- Activate the Driver account.
- Download and install the worxTMS Driver App Android Only
📱 Download worxTMS Driver App:
https://play.google.com/store/apps/details?id=org.worxtms.client.app
💡 Tip: Copy the link above and share it with your driver via WhatsApp for easy installation.
- Log in using the Username and Password created above.
- Toggle the Tracking Switch from Red to Green in the App's top bar.
- Allow all requested Location and Background Tracking permissions.
- Verify the Driver appears on the Tracking Map.
⚠️ Important: The Username and Password created here are the login details your Driver will use to access the worxTMS Driver App. For reliable tracking, the Driver must enable Tracking and allow all requested Location permissions.
📱 Android Only: The worxTMS Driver App is currently available for Android devices only. iOS support is coming soon.
🎉 Setup Complete!
Your worxTMS system is now configured and ready for use.
- ✅ Create and Assign Shipments
- ✅ Manage Drivers
- ✅ Live Track Deliveries
- ✅ Upload PODs and Documents
- ✅ Generate Online Waybills
- ✅ Use Tracking and Delivery Reports
💡 Start Testing: Go to Create, add your first Shipment, assign it to a Driver, and see how worxTMS works within your business.
Many businesses use worxTMS purely for Delivery Management, Driver Management, GPS Tracking, POD Management, Online Waybills, and Reporting without connecting an Accounting System.
🚀 Start with the basics: Create Shipments, assign Drivers, and track deliveries. Once you're comfortable, you can explore additional features such as Rate Sheets, Fuel Reports, Address Books, Advanced Reporting, Customer Portals, and Accounting Integrations.
If you would like worxTMS to automatically generate invoices in your Accounting System, continue to Step 3 and integrate QuickBooks Online, Xero, or FrontAccounting.
Step 3: Integrate Your Accounting System (Optional)
Your worxTMS system is already operational for dispatching, tracking, POD management, waybills, and reporting. This step is only required if you would like worxTMS to create Customer Accounts, provide Customer Self-Service features, and generate Invoices in your Accounting System.
Without an Accounting Integration
- ✅ Create Shipments
- ✅ Assign Drivers
- ✅ GPS Tracking
- ✅ Upload PODs
- ✅ Generate Waybills
- ✅ Reports & Analytics
- ✅ Share worxLIVE Tracking Links
- ❌ Generate Invoices
- ❌ Customer Self-Service Portal
With an Accounting Integration
- ✅ Create Shipments
- ✅ Assign Drivers
- ✅ GPS Tracking
- ✅ Upload PODs
- ✅ Generate Waybills
- ✅ Reports & Analytics
- ✅ Share worxLIVE Tracking Links
- ✅ Generate Invoices
- ✅ Customer Self-Service Portal
- ☐ QuickBooks Online - View the QuickBooks Online Integration Guide.
- ☐ Xero - View the Xero Integration Guide.
- ☐ FrontAccounting - View the FrontAccounting Integration Guide.
⚠️ Important: Customer Accounts in worxTMS are synchronized directly from your Accounting System. Until an Accounting System is connected, worxTMS uses a default House Account. You can still create, assign, track, and complete Shipments, but Invoice Generation and Customer Self-Service features are unavailable.
💡 Customer Self-Service: Allows Customers to log in, create Shipments, track Deliveries, view PODs, and access shipment information online.
💡 FrontAccounting Included: If you do not currently have an Accounting System, worxTMS can provide and host FrontAccounting for you at no additional cost.
🚀 Recommendation: Spend some time creating Shipments, assigning Drivers, tracking Deliveries, uploading PODs, and generating Waybills before moving on to Accounting Integration.