Traccar Admin Login and Registration – GPS Tracking Integration | iShiply.com
Tracking
Admin users can manage tracking devices, create driver accounts, and view live vehicle locations in Traccar. Follow the steps below to install apps, add devices, create drivers, and verify live tracking.
Watch: Adding Tracking Devices
Step 1: Install the Tracking App on Mobile Devices
Install the Traccar Client App on all driver mobile phones. This app enables real-time tracking and reporting for your vehicles.
- Android: Download from Google Play Store (Search for Traccar Client)
- iPhone: Download from Apple App Store (Search for Traccar Client)
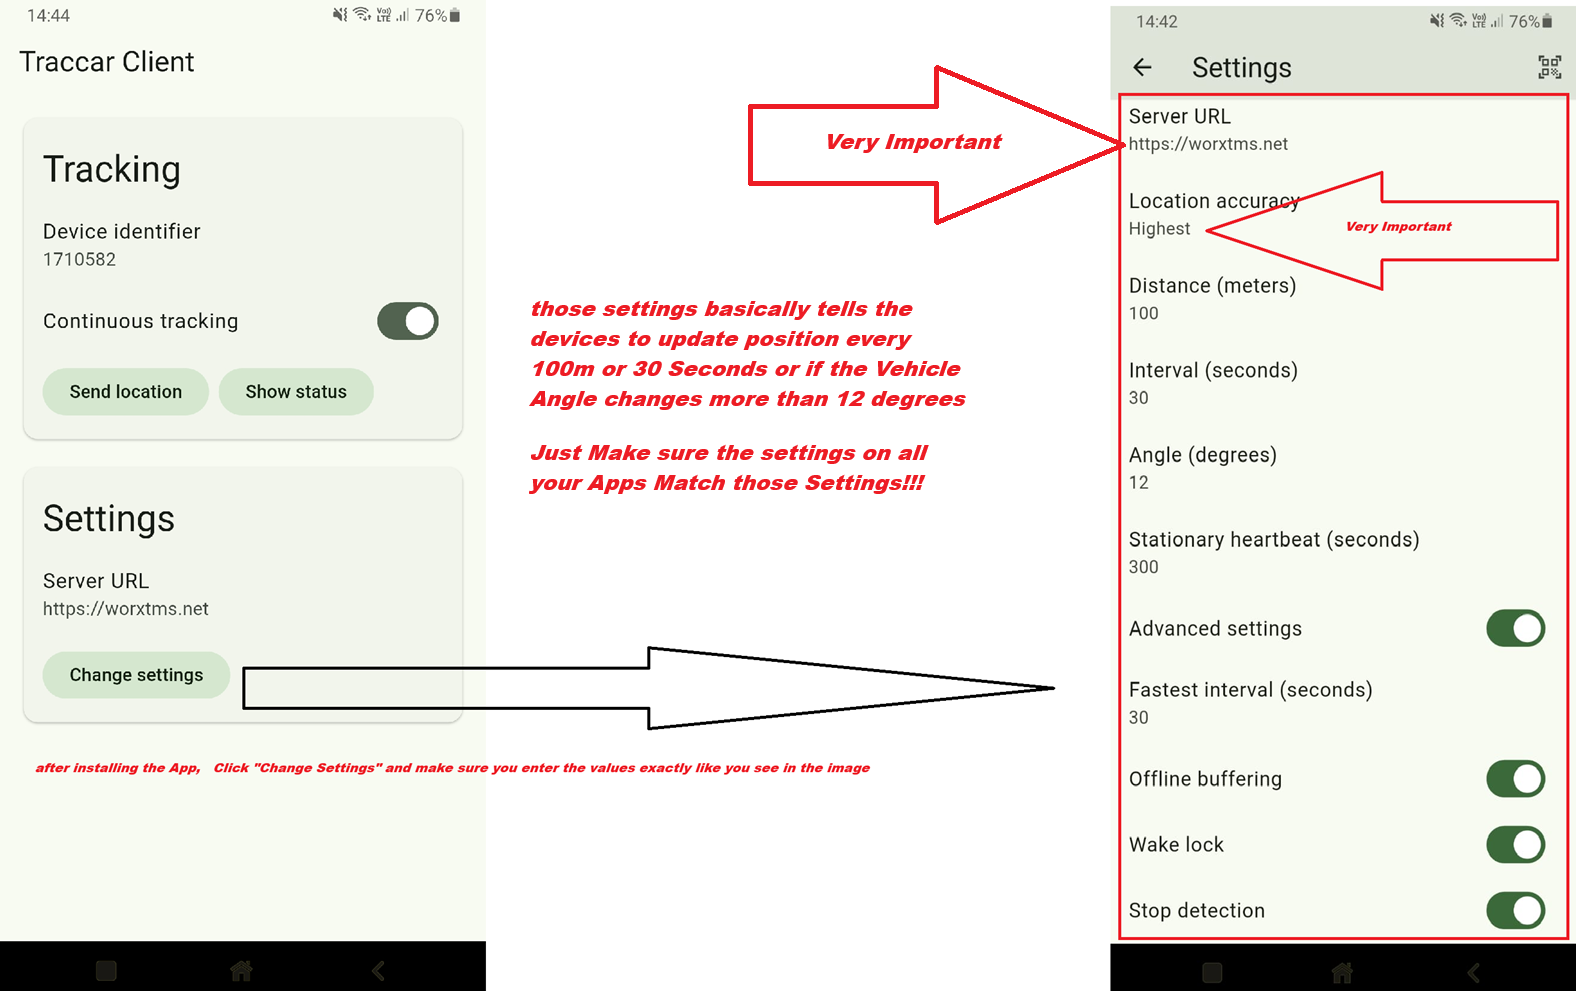
- Below are the settings that worked best for us — make sure your apps use the same settings.
- If you plan to use the worxTMS system, we highly recommend installing dedicated in-vehicle GPS trackers for the most reliable, accurate, and hassle-free tracking.
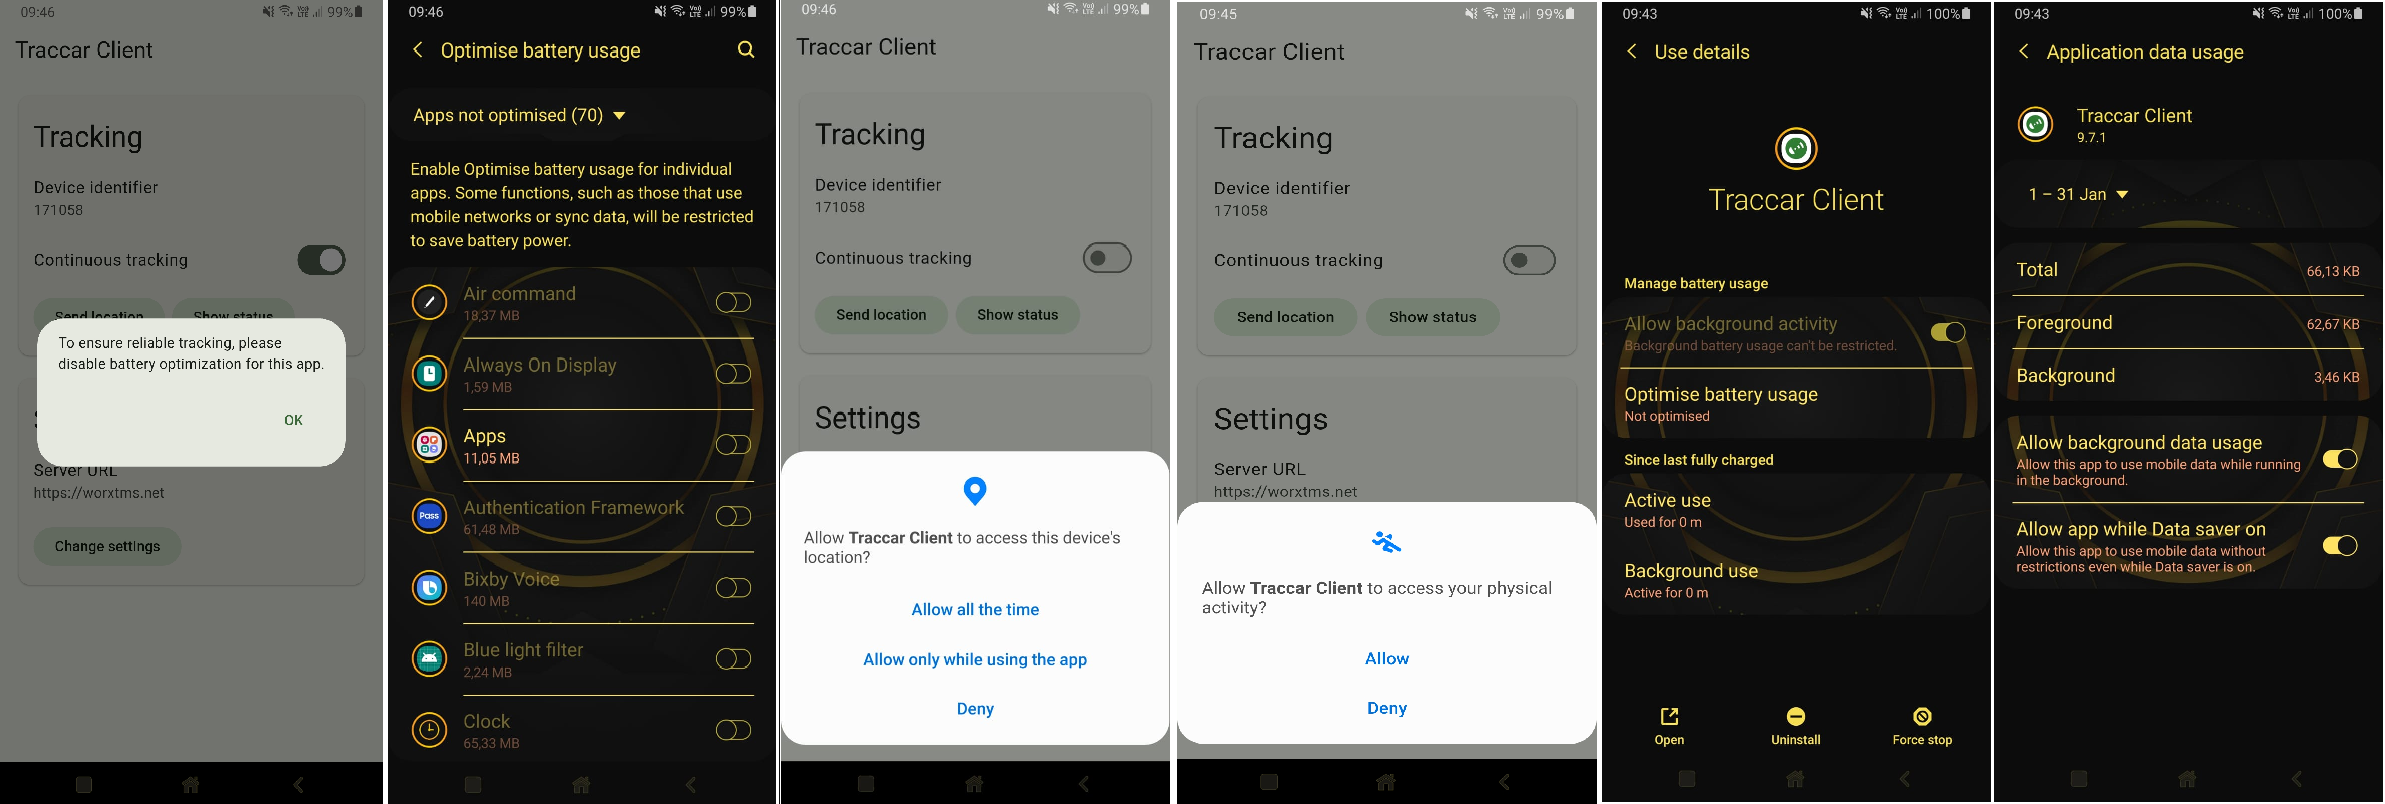
⚠️ Important: Allow these Permissions for Reliable Tracking
- Background Location usage
- Unrestricted Battery usage / Ignore Battery Optimizations
- Any other permissions the app asks for to function correctly
💡 Why this is important: Modern smartphones aggressively manage battery and background apps. If these permissions are not allowed, the Traccar Client app may be automatically killed or restricted, causing tracking to stop.
📸 Example screenshot showing the permissions that must be enabled:
Step 2: Add Your Tracking Devices
After installing the app, or if using hardware trackers, add each device to the Traccar platform. Click the ‘+’ button in the device management section.
- Device Name: Enter your Drivers Name
- Unique ID: Enter the Device ID for the Apps but will use the IMEI for the In-Vehicle units!.
- Once added, devices appear live on your map if online and configured.
Step 3: Create Your Drivers
Add the Drivers / Vehicles
- Name: Enter the driver’s name. / or Vehicle Registration
- Identifier: The "Device Identifier" from the App. / or IMEI if using In-Vehicle Trackers
- Once added, drivers are linked to devices and appear live on the map.
Step 4: Verify You Can See Vehicles in Traccar
Check that all your devices show up live on the Traccar map. If not, review device settings and ensure trackers are powered and connected. This can take a few minutes at times!
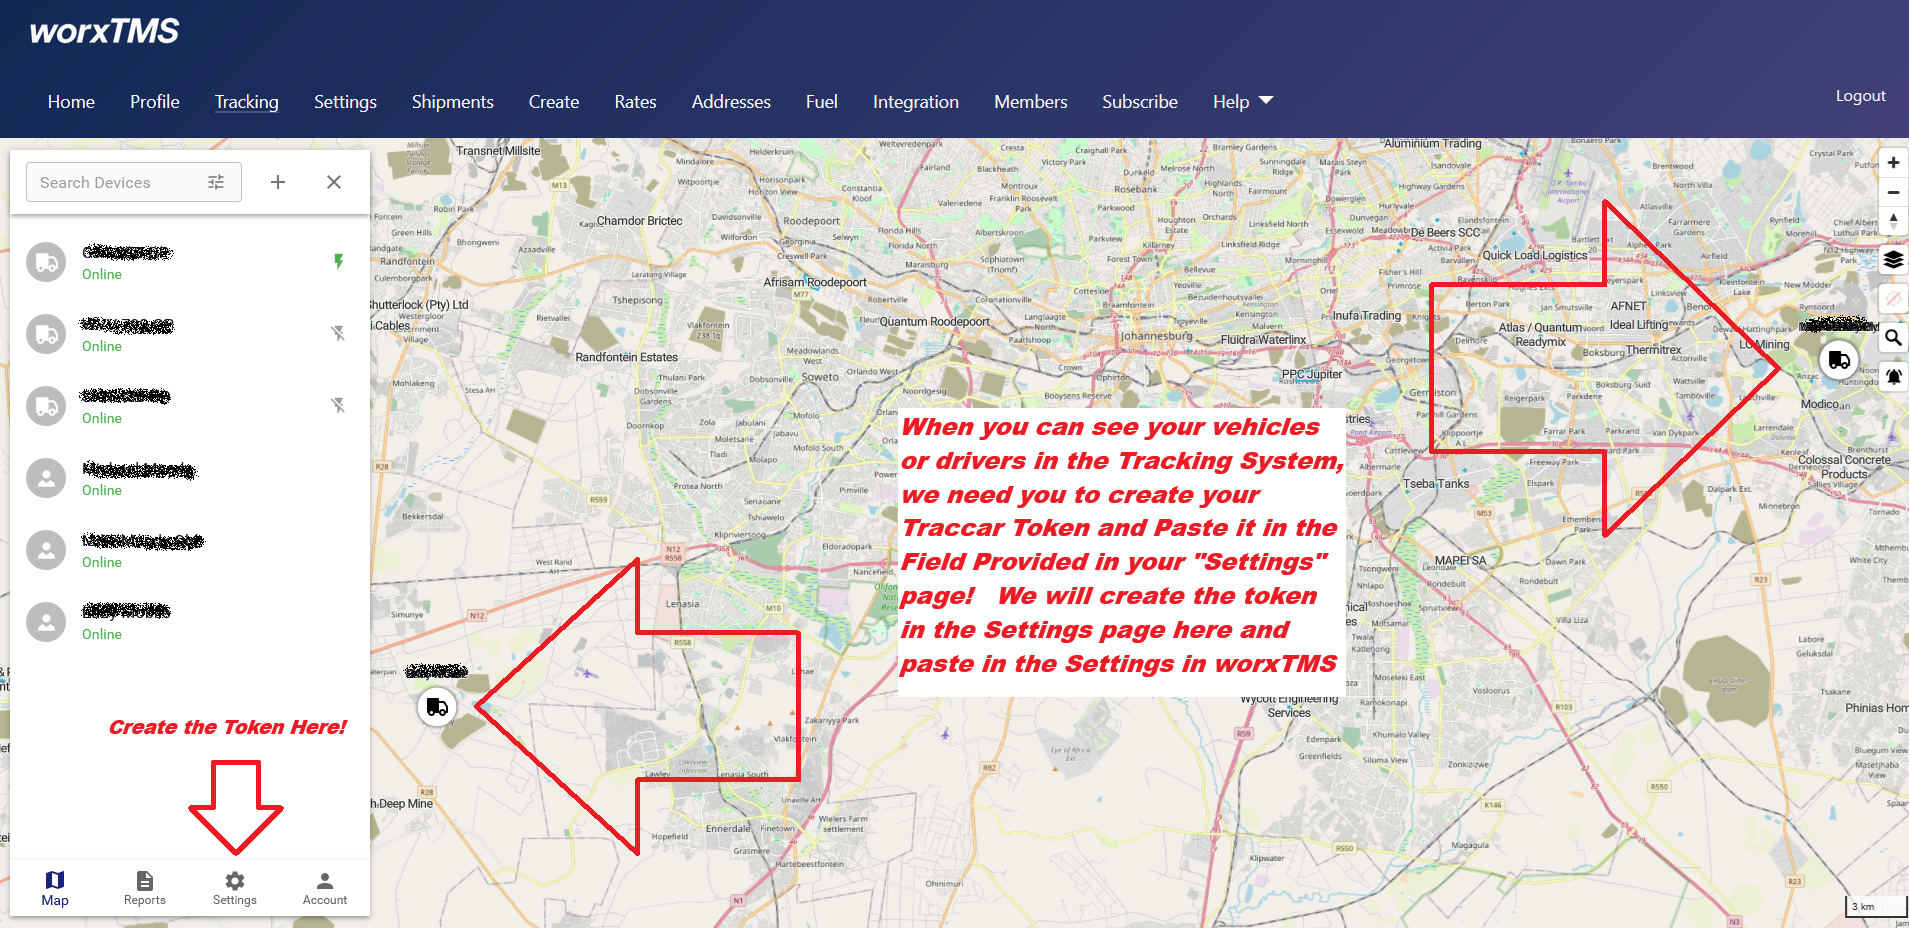
Three Ways to Track Your Vehicles
You now have three options to track your vehicles:
- 1️⃣ Mobile App (Traccar Client): Install the Traccar Client App on your drivers’ mobile phones. Works for Android and iPhone.
100% Free: No additional cost. - 2️⃣ Dedicated GPS Tracking Devices: Install physical trackers directly in your vehicles.
Requires Purchase: You need to buy hardware units per vehicle.Advantages of In‑Vehicle Units:- No Drain on Phone Battery: Runs on the vehicle battery.
- Always On & cannot be turned off: More tamper‑resistant.
- Independent of driver’s phone: Tracking continues even if the driver’s device is off.
- More reliable data: Supports vehicle sensors and CAN bus.
Recommended Device:
We have tested this GPS tracker and found it works very well:
Real-Time GPS Vehicle Tracker by iStartek
That is just one option — many more supported devices can be found on the Traccar Devices Page. - 3️⃣ Using an Old Mobile Phone as a Tracker:
You can repurpose an older Android device, leave it hidden in the vehicle, and keep it permanently charging.- Very Cheap: Often free if you have old devices.
- Accurate GPS: Phones typically have strong GPS performance.
- No wiring needed: Just plug into a USB charger.
Important Notes:- Must stay powered (use a reliable 12V USB charger).
- Needs mobile data (SIM card required).
- Hide it properly to prevent tampering.
- High heat inside vehicles can damage devices.
Dedicated Tracking Devices support the following sensors:
- Fuel Level
- Temperature / Heat Sensor
- Driver ID
- Door Open / Closed
- Panic / SOS Button
- CAN Bus Data
- Tire Pressure Monitoring
For more details, visit Traccar Official Website.
Highly Recommended Dedicated GPS Tracker Setup
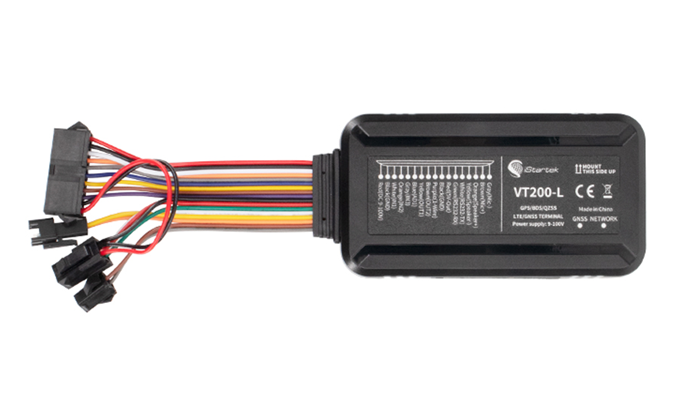
Example device: iStartek VT200
There are many other GPS trackers that work in the same way. Each comes with its own SMS instructions. Check local stores or online marketplaces (Amazon, etc.) for compatible options.
Installing this tracker is super simple — just connect the red and black wires for power. Optionally, you can connect the orange wire to vehicle ACC to detect ignition on/off — but only power is required for it to work perfectly.
- Insert a SIM card into the tracker
- Power the device using just the red and black wires
- Optionally connect the orange wire to vehicle ACC for ignition detection
- Send the SMS commands below to configure it
- Done — the tracker is now live on worxTMS
- Optionally, purchase the tracker directly from the manufacturer (under $30): View Product
SMS commands to configure your tracker for the Traccar server:
From your mobile device, send the following SMS commands to the SIM in your tracker to connect it to our self-hosted Traccar server:
0000,100,1,worxtms.net,5055
0000,106,10
0000,121,12
0000,122,60
- Server: worxtms.net
- Update Interval: Every 10 seconds
- Angle Change: Updates on turns ≥ 12°
- Heartbeat: Keeps the device alive when stationary
- Much more reliable than mobile apps
- No battery optimisation or app shutdown issues
- No driver interaction required
- Consistent, high-accuracy location data
- Ideal for fleet, dispatch, and compliance tracking
💡 Pro Tip: Test with an Old Smartphone
If you’re considering in-vehicle GPS trackers, you can first test tracking using an old smartphone. Keep it permanently powered in the vehicle and run our app to monitor its location. When a phone is externally powered, it avoids battery optimization and background service shutdowns, so it tracks much more reliably — similar to a dedicated GPS tracker. Phones can work, but for reliable, hassle-free tracking, dedicated in-vehicle trackers are highly recommended with worxTMS
This is a low-cost way to trial location monitoring before investing in dedicated trackers. Once you’re confident it works for your fleet, you can upgrade to a dedicated GPS tracker for consistent, hassle-free tracking.